源码下载 通过git clone命令来下载下来源码
1 git clone https://github.com/spring-projects/spring-framework.git
下载下来后可以将分支切换到自己想要查看的分支
1
2
git branch -a git checkout 5.3.x
main
Gradle预准备 查看spring-framework\gradle\wrapper\gradle-wrapper.properties中的gradle版本,前往官网 下载对应版本并进行解压安装。
构建仓库修改 修改spring-framework\build.gradle文件,找到repositories这个配置项,中括号里增加
1
2
3
4
5
mavenLocal() maven { url 'https://maven.aliyun.com/nexus/content/groups/public/' } maven { url 'https://maven.aliyun.com/nexus/content/repositories/jcenter' } maven { url 'https://plugins.gradle.org/m2/' } maven { url 'https://maven.aliyun.com/nexus/content/repositories/google' }
buildSrc修改 修改项目根路径下buildSrc\build.gradle文件,找到repositories这个配置项,中括号里增加
1
2
3
4
5
mavenLocal() maven { url 'https://maven.aliyun.com/nexus/content/groups/public/' } maven { url 'https://maven.aliyun.com/nexus/content/repositories/jcenter' } maven { url 'https://plugins.gradle.org/m2/' } maven { url 'https://maven.aliyun.com/nexus/content/repositories/google' }
修改settings.gradle 新增阿里云镜像
1 2 3 maven { url 'https://maven.aliyun.com/nexus/content/groups/public/' } maven { url 'https://maven.aliyun.com/nexus/content/repositories/jcenter' }
注释掉io.spring.ge.conventions插件
导入IDEA 首先直接用idea以安全模式打开源码项目,并不会对项目进行编译构建
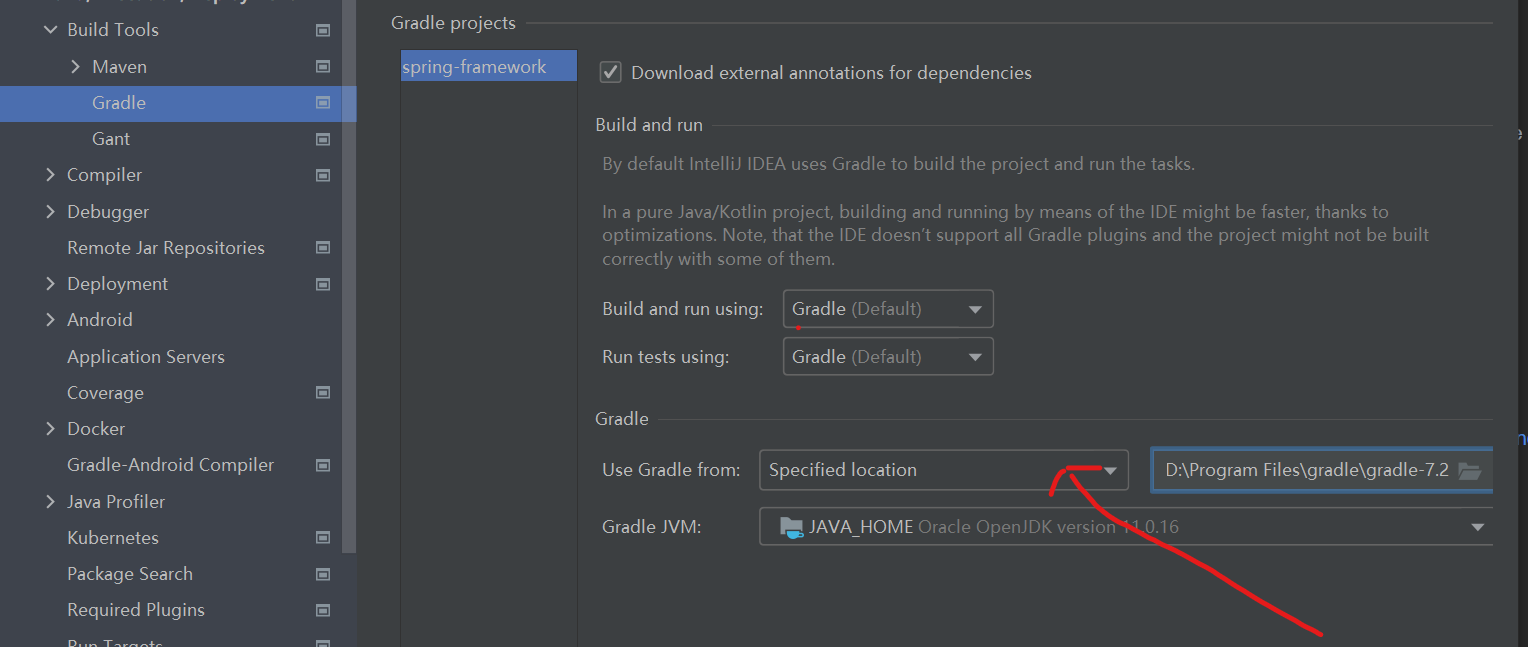
修改gradle路径为刚才下载的路径
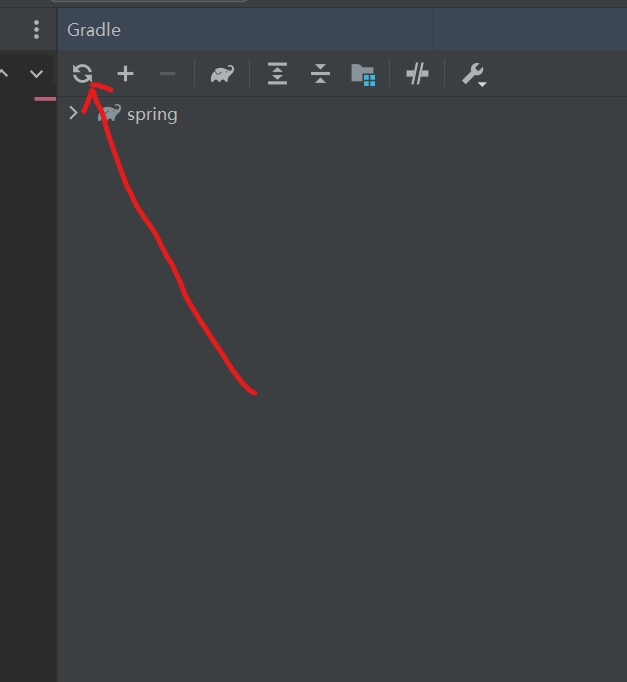
通过gradle刷新按钮来对项目进行构建
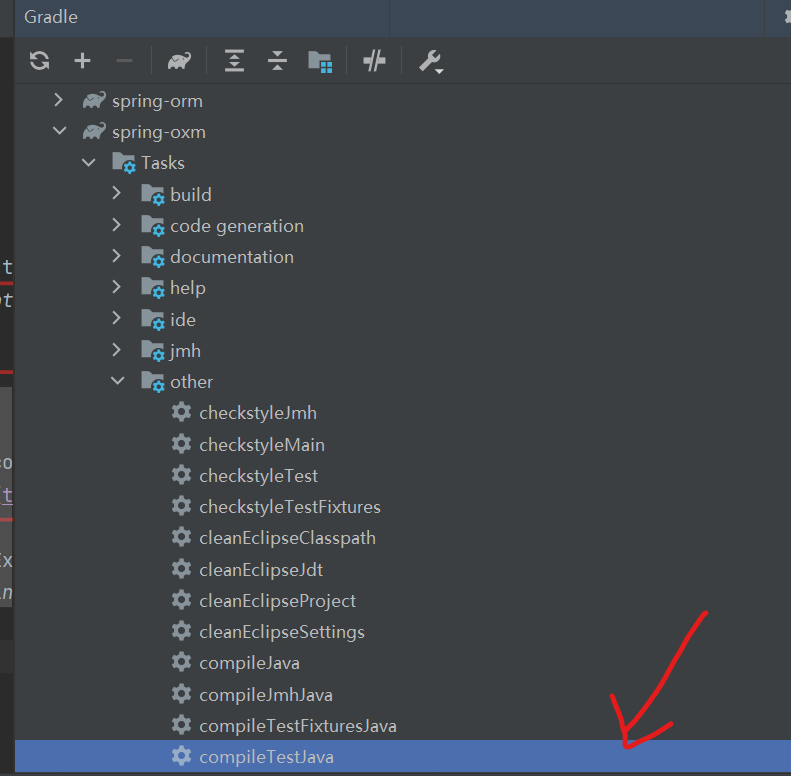
预编译spring-oxm:compileTestJava
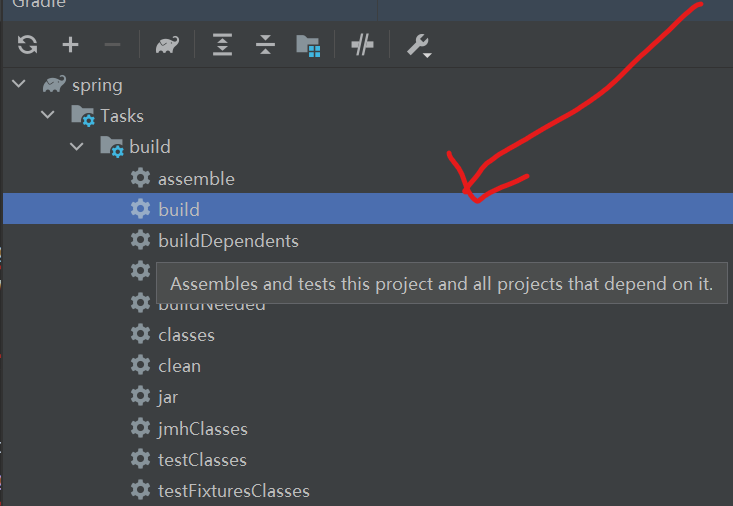
最后通过项目root的build来编译整个项目
遇到的问题和解决方法 预编译 spring-oxm (Windows 环境下在项目根路径执行命令 gradlew.bat :spring-oxm:compileTestJava)模块报错:org.gradle.process.internal.ExecException: Process ‘command ‘git’’ finished with non-zero exit value 128 1 2 多半是因为你的项目源码是通过下载的方式获得,而非通过 git clone 命令克隆而来,可以不解决。 如果有强迫症,非要解决,建议通过 git clone 命令去克隆项目源码,然后重新编译。
缺少 spring-cglib-repack-xxx.jar 和 spring-objenesis-repack-xxx.jar 依赖 1 2 3 4 解决方案: 【方法一】在源码项目根路径下执行:gradle objenesisRepackJar、gradle cglibRepackJar。 【方法二】在 IntelliJ IDEA 的侧边工具打开 gradle,分别双击 spring-core -> Tasks -> other 下的 objenesisRepackJar 和 cglibRepackJar。 以上两种方法均会在项目的 spring-core\build\libs 目录下生成所需 jar 包。
在运行某些测试类时,IntelliJ IDEA 报错:Command line is too long …… 的解决办法 1 2 解决方案: 找到当前项目 .idea\workspace.xml 文件中的 <component name="PropertiesComponent">,并在其中加一行 <property name="dynamic.classpath" value="true"/>,然后重新运行。
运行时报错:No tests found for given includes: [**/*Tests.class, **/*Test.class]…… 1 2 3 4 5 6 7 8 9 10 11 12 13 报错详情: Execution failed for task ':模块名称:test'. > No tests found for given includes: [**/*Tests.class, **/*Test.class](include rules) [......](--tests filter) 解决方案: 配置测试运行器为 IntelliJ IDEA 即可。IDEA 中的具体步骤: 1、进入 Gradle 设置页面:File -> Settings -> Build,Execution,Deployment -> Build Tools -> Gradle 2、修改:将 Gradle Projects 面板中的 Run tests using 选项值改为 IntelliJ IDEA 【说明】在 Run tests using 选项列表中,为 Gradle 项目指定测试运行器,区别如下: 1、Gradle:选择此选项将使用 Gradle 作为测试运行器。结果是在持续集成(CI)服务器上获得相同的测试结果,在命令行中运行的测试将始终在 IDE 中运行。 2、IntelliJ IDEA:选择此选项可将测试过程委派给 IntelliJ IDEA。在这种情况下,IntelliJ IDEA 使用 JUnit 测试运行器,并且由于增量编译,测试运行得更快。 3、Choose pre test:选择此选项可配置每个测试专门使用哪个测试运行器(Gradle 或 IntelliJ IDEA)。
出现 AutowiredAnnotationBeanPostProcessor.java:542: 错误: 对 determineRequiredStatus 的引用不明确 1 2 3 4 5 6 7 8 报错详情: spring-beans\src\main\java\org\springframework\beans\factory\annotation\AutowiredAnnotationBeanPostProcessor.java:542: 错误: 对determineRequiredStatus的引用不明确 return determineRequiredStatus( AutowiredAnnotationBeanPostProcessor 中的方法 determineRequiredStatus(MergedAnnotation<?>) 和 AutowiredAnnotationBeanPostProcessor 中的方法 determineRequiredStatus(AnnotationAttributes) 都匹配 解决方案: 将 return determineRequiredStatus(ann.asMap(mergedAnnotation -> new AnnotationAttributes(mergedAnnotation.getType()))); 更改为 return determineRequiredStatus(ann.<AnnotationAttributes> asMap(mergedAnnotation -> new AnnotationAttributes(mergedAnnotation.getType())));
出现 CoroutinesUtils.java:74: 警告: [deprecation] AccessibleObject中的isAccessible()已过时 1 2 3 4 5 6 报错详情: spring-core\src\main\java\org\springframework\core\CoroutinesUtils.java:74: 警告: [deprecation] AccessibleObject中的isAccessible()已过时 if (method.isAccessible() && !KCallablesJvm.isAccessible(function)) { 解决方案: 在 org.springframework.core.CoroutinesUtils.invokeSuspendingFunction(Method method, Object target, Object... args) 方法上加 @SuppressWarnings("deprecation") 注解即可。
编译过程中出现与 ‘-Werror’ 有关的错误及其解决方案 1 2 3 原因:-Werror 的作用是将全部的 warning 当成 error。 解决方案:全局搜索 -Werror 关键字,并注释该选项。
使用高版本 jdk 时,出现:module java.base does not “opens java.lang” to unnamed module…… 错误 1 2 3 4 5 参考 https://blog.csdn.net/qq_27525611/article/details/108685030 原因:由 jdk9 及以上版本中引入的 Java Platform Module System 导致。 解决方案1【降级 jdk 版本】:降级至 jdk8 即可。 解决方案2【添加 VM 参数】:--add-opens java.base/java.lang=ALL-UNNAMED。
出现工程某些类找不到的错误 1 2 3 原因:大部分情况都是在 xxx.gradle 文件中使用了 optional 选项引入的依赖。 解决方案:参考其他依赖引入方式,比如将 optional 改为 api。


